Friday, April 29, 2011

Monogram Birthday Cookies

I've been looking for a reason to try royal icing transfers. Today is my step-sister's birthday and I thought that would be a perfect occasion for some monogram cookies!

I wanted to do her initial as well as flowers.

I started by going into Word and picking out a font I liked and typing a bunch of “N”s. I did a couple different sized fonts (wish I’d have gone even bigger) and printed it out.

Then I taped the printed sheet to my table and taped a piece of wax paper over it.

Then I just colored in the lines.

When these dried I found they were still pretty brittle so I went over them with a second layer of icing while they were still on the wax paper. A thicker consistency royal icing probably would have helped with this.

In the meantime I also made some flowers on another piece of wax paper.

Several hours later, when the letters and flowers were dry, I started outlining and flooding my cookies. For these cookies I didn’t let the outline dry before flooding, I just used 10-second flood icing to outline and immediately flood the cookies.

To create the polka dots I just piped small drops of icing onto the wet cookie. They blend in for a smooth look.

I added the royal icing transfers directly onto the wet icing - I didn’t wait for it to dry. I wanted them to nestle in a bit rather than adhering them after onto a slightly rounded dome of icing.

These were really fun to make!

Happy Birthday, Nicole!

Thursday, April 28, 2011

Butterfly Cookies

Well, supposedly it is spring right now. Doesn’t feel like it here in Minnesota – there were even flurries flying around today. It’s madness, I tell ya! Here’s my open letter to Mother Nature:

Dear Mother Nature,
I appreciate your attempt at getting us the snowiest winter of ALL TIME here in Minnesota. Really I do. I mean, it would make those of us who survived it – with not one, but TWO trips to the Snowblower Repair Shop – look pretty Bad @ss.

But this is the land of 10,000 beautiful lakes! Stop teasing us, making us think we will be able to use and admire them soon.

I just want to go on the record and say that I’m okay with only being the 4th snowiest winter in Minnesota history. I’m good with that, I’m down with that, it’s fantastic. We had a good run. 4 is a respectable number. In fact, I’m pretty sure that would be an ‘A’ on a standard grading scale.

Just trying to be a friend here and say: no one likes an over-achiever. An ‘A’ is an ‘A.’ Let’s be done.

Please turn our sepia-colored world into color soon. Thanks.

Pining for spring,
Leah

Well, hopefully Mother Nature gets the hint but in the meantime, since it is refusing to be spring outside, I decided to bring spring inside.

I came across this adorable site, Sweetopia. Marian is the author and she makes gorgeous cookies and other treats (I’ve been perusing the archives!). There is a great post with these beautiful butterfly cookies that I thought would be fun to try.

Since I wanted the outline to stand out on these cookies, I did that first and let it dry for a couple hours.
My butterfly cutter was a little Plain Jane so I decided to freehand some more interesting-winged butterflies.

While they were drying, I prepared all of my icing colors (pink, yellow, green, blue, purple, and white) for flooding. It had already been colored it but was resting so the air bubbles would rise.
This is actually a photo of them when I was finished...

When the outlines were dry I experimented with different color combinations.

Now that they are complete, I have some other ideas for wing designs so I’m looking forward to making these again!


What are you looking forward to this spring?
Have you made any spring-inspired treats lately?

Monday, April 25, 2011

Housewarming Cookies & Baking Tips

About a month ago my little sister moved to Arizona (from Minnesota). She’s getting settled into her new apartment and I decided to send some homemade cookies as a little housewarming gift.

As you can probably tell from the frosting, I made these while decorating some flower cookies. They aren’t your typical house colors, that’s for sure!

These are pretty big cookies, over 4-inches wide. All but one made it there in one piece! I was happy with that. :-)

With all of the cookies I’ve been making lately, I’ve gotten pretty efficient at turning them out quickly and with little mess. Here are some of my top tips that make things easier and less messy for me:

1) Roll out dough on parchment paper
 When I was little and we made rolled cookies we would practically cover the whole table in wax paper and my little sister and I would roll out cookies on that and then transfer them to a pan for baking. This generally created a huge mess-zone and got flower everywhere. The cookies would stick to the wax paper and our cookies would be deformed by the time they made it to the cookie sheets (but hey, they still tasted good!!).
Now, I take a piece of parchment paper and lay it on my marble board and roll out dough on that. I generally use 2-3 pieces of parchment paper per baking session - you can reuse them. I find this cuts down on the mess dramatically. Less moving things around. Smaller work area. Win. Win.

2) The general idea of rolling things out on parchment paper is that you don't have to move them so it doesn't deform the cookies. However, if you have to cut the shapes too close together for some reason, this is a great tool/method for moving them while maintaining their shape.
You can pick one of these up at Target and many other places. Handy kitchen tool.

3) Once you have your cookies cut and arranged on your parchment, take a cookie sheet, edge it up next to your work surface, and just slide the parchment with the cookies right onto it.
At this point, you can pop it in the fridge to cool the dough back down to help prevent too much spreading while baking or put it in the oven if you aren't worried about that.

Pretty soon you'll have a stack like this, ready for your decorating and creativity!

Happy Baking!

Thursday, April 21, 2011

Easter Cake Pops & an Edible Easter Centerpiece


Easter is coming up quick! We are heading out of town tomorrow to celebrate Easter with B’s side of the family. B is an accountant and this is the first weekend since being released from the bondage of tax season (yay!!). It will be nice to get away for a few days.

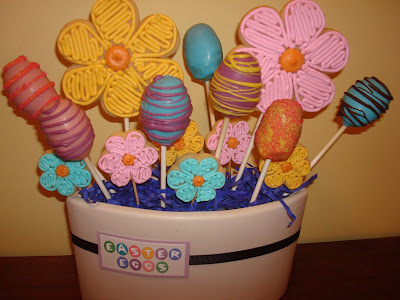
I had an idea for an edible centerpiece using cake pops and cookies. So while making cake pops this week, I decided to make some easter egg cake pops as well.

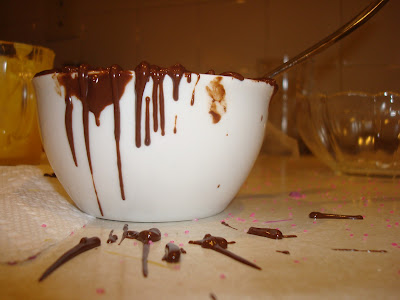
Working with the melted chocolate was quite a humbling experience. Certainly not as easy as it looks! My eggs didn’t turn out like I had envisioned.

They don’t exactly scream Easter... In fact, they pretty much look like a hot mess.

And, I'm not positive, but this one may or may not be getting ready to hatch a tiny dragon...

But, oh well, Easter must go on!
As for the cookies for my centerpiece, remember my cookie experiments last weekend? I wanted to try making cookie pops and mini cookie pops.

These are actually a total snap! I'm definitely looking forward to more excuses to make these. 

For the little cookies I just rolled the dough out like I normally would for my cookies.

I inserted the toothpicks carefully and baked as usual.

Then I just cooked them as usual. It was really that easy!

These would make such a cute topper for cupcakes. You could use any shape or even cut out letters to spell someone’s name.


For the big cookie pops I rolled my dough extra thick, just shy of half an inch, and cut out cookies like normal. While the dough was still raw, I gently inserted a 6-inch lollipop stick into the cookie. It goes it pretty easily if you twist it slightly while inserting it.

I flipped my cookies over to check if the stick had broken through the dough on the bottom side and in three out of four cookies, it had. On those ones I just took a little dough and pressed it flat with my fingers and patched it up. Then I put that side face-down on the pan.

I cooked them a couple minutes longer than usual since they were so thick.

They cooked up beautifully and the lollipop sticks didn’t catch on fire in the oven so that’s a plus! Not that I was irrationally worried about that or Googled incessantly in preparation to make sure it was okay.

But all was well and they came out great!

Tonight I decorated the big and small cookies, dressed up a small vase-thing I had, and ta-da! An edible centerpiece.

What about you... Any Easter projects? Or, cake pop projects gone bad?

Wednesday, April 20, 2011

Harnessing my inner Bakerella


Have you heard of bakerella? She is the Queen of Cake Pops. Amazingly talented and endlessly creative. I don’t know where I’ve been but I just learned of her adorable creations a couple months ago.

Never heard of a cake pop? Cake pops are basically cake mixed with frosting, shaped into balls, put on a stick, and dipped in chocolate. Frankly, I don’t know why I never thought of this, when I was little my preferred method of eating cake was to mash all the cake and frosting together. I thought it tasted better all mixed up. I have since reverted to eating my cake like a normal person in case you are wondering... :-)

Well I decided to harness my inner bakerella and try my hand at these. I’ve never actually tasted a cake pop or seen one in person so I’m going in a little blind as to what the end result should be like. But that’s okay because I realized that means mine will be the best I’ve ever had! Win!

To make the cake pops I pretty much followed bakerella’s instructions.

I made the cake last night and let it cool overnight. Just went with a store bought cake - devil's food.
Tonight I made the frosting, I decided to use a homemade frosting rather than canned. 
Then I crumbled the cake.

And mixed them together until I got an even consistency that would form into balls easily.

Then I formed them into balls, covered them, and put in the freezer for 15 minutes

I formed the cupcakes by pressing the balls into a 1” flower cutter and then shaping the top into a nice dome.


After that I put them back in the freezer for another 10 minutes

When they were almost ready to come out, I melted the chocolate for the bottoms.

Then I dunked the bottoms in the chocolate, and then turned them upside-down to let any excess drip (this is a messy job!)

I dipped the end of the lollipop stick into the melted chocolate and inserted it into the bottom of the cupcake.

I then set them on wax paper while working on the others.

I popped them in the fridge and got together the rest of the decorations.

I used pink and blue candy melts for the tops.
 

When the chocolate was hardened, I dipped the tops into the melted candy.

Try to get all of the excess candy coating off by tapping your hand on your wrist to gently shake the pop.

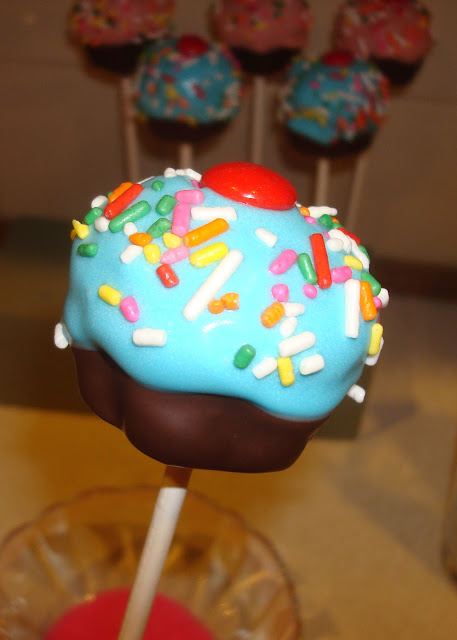
Then I decorated the tops with sprinkles and a red M&M.

I made some in blue since these are for a special birthday boy this weekend - my nephew.
The inside of a cake pop

They are just too adorable.

I can't stop looking at them.

No, really. This may be an issue.

So, there you have it. Cake pops. Cupcake pops. Cupcake cake pops. Doesn’t matter what you call them, they’re awesome!

Maybe this cake pop had a little too much fun...?

Monday, April 18, 2011

Cookies galore


I had a couple different objectives in mind when making up a batch of dough this weekend and I think I’d consider all of them a success!

Goal 1: Try out some tweaks to my usual sugar cookie and frosting recipes
Last weekend I tried a different recipe for rolled sugar cookies while trying flooded sugar cookies for the first time (see the results here). I loved the slight almond flavor of the cookies but the texture wasn’t what I was used to from my usual recipe. So, here’s what I came up with – the best of both worlds.

This recipe makes delicious, soft, chewy cookies.

Rolled Sugar Cookies
Ingredients
5 cups all-purpose flour
1 teaspoon salt
1 1/2 cups butter
3 cups granulated sugar
4 eggs
1 teaspoon vanilla extract
1 teaspoon almond extract

Directions
1. In a large bowl, combine the flour and salt. Set aside.
2. In electric mixer, cream together butter and sugar until smooth. Beat in eggs and extracts. Gradually add the flour mixture. Cover, and chill dough for at least one hour (or overnight).
3. Preheat oven to 400 degrees F. Roll out dough on floured surface 1/4 inch thick. Cut into shapes with any cookie cutter. Place cookies 1 inch apart on ungreased cookie sheets.
4. Bake 6 to 8 minutes in preheated oven. Cool completely.

Sugar Cookie Frosting
Ingredients
4 cups confectioners' sugar
1/2 cup shortening
5-9 tablespoons milk
3/4 teaspoon vanilla extract
1/4 teaspoon almond extract
food coloring (optional)

Directions
1. In a large bowl, begin creaming together the confectioners' sugar and shortening at low speed with an electric mixer.
2. Add 4 tablespoons of milk and the extracts.
3. If needed, add additional milk a little at a time until you get the desired consistency. It should be thick and smooth. Divide and color with food coloring if desired.

Goal 2: Figure out how I’m going to decorate cookies for a birthday party next month
I’m always looking for reasons to bring treats into work – I love to make them... and also love to spread out the calories! I’ve brought my sugar cookies a few times and one of my coworkers recently asked if I could make them for her daughter’s 5th birthday party.

I was so flattered and of course I said yes! I’m very much looking forward to making them. I’m going to be making flowers in two sizes – 1” and 3”. I had a 3” flower cutter which I’ve used before but not a 1”. So I headed to Michael’s and got the 1” size. 

So I got my test batch made but I decided my usual way of frosting them – with just a knife – wouldn’t suffice. I wanted something more special for a 5 year old girl who loves pink and purple and sparkles (from what her mom tells me :-). And plus, I wouldn’t turn down a chance to play with making things pink and sparkly and adorable! We’re talking the same language - this is a girl after my own heart!

First I made up a batch of my sugar cookie frosting.

Then I divided it up into four bowls and picked colors.


I used my new Wilton gel paste food coloring to color the frosting. I decided on pink, purple, and blue for the flowers.

It doesn't take much color with the gel colors.
A mix of Teal and Royal Blue

And this is what we get! I've learned after using these a few times that the color gets a lot deeper as it dries. You can tell in the final photos.

With gel coloring you use toothpicks to add color to the frosting.

Then I got out some piping bags, put a coupler tip in each one.

I snipped the bag and added a piping tip to each one.
Push the coupler piece as far down as it will go.

Snip off the end of the bag just a bit past the end of the coupler.

Add a decorating tip and screw on the other piece of the coupler.
Then I prepped the bags for filling. If the frosting has started to crust at all while coloring the other dishes, give it a good stir before adding it to the bag.
Fold the bag over the edges of the glass and fill

Hold filled bag under cuff and pull down near the coupler
with the other hand to fold up the edges of the bag.

After they were filled, I twisted the tops and added a twist tie to secure them.

And we’re ready to pipe on our frosting!


I tried a few different designs, piping the frosting onto the flowers with different size decorating tips. Nothing was turning out (luckily mistakes still taste good when it comes to decorating!). Finally I came up with a few things I liked. I think they turned out pretty cute.


Sugar cookie sandwiches - complete with shimmer dust!


I love the shimmer dust on the cookies, it’s so cute! I think they’re perfect for a little girl’s birthday party. I hope she loves them! Today I brought in a little box filled with them for my coworker to bring home.

Goal 3: Experiment with cookie pops
I was excited to try this one out. I have a few ideas for cookie pops coming up and I figured since I was making a batch of dough to test stuff out with, I might as well test this out too.

I’ll be using my cookie pops in a project later this week so I will post photos and instructions for that then.

Goal 4: Try out some of my fun new decorating toys
On Sunday I picked up the Wilton Ultimate Decorating Kit from Michael’s (yay for 50% off coupons!). 177 pieces of cake/cookie-decorating joy.

I bought it in prep for starting the Wilton Decorating Basics class in a couple weeks. And there are two more courses after that one but I haven’t decided yet if/when I will take them.

When I was done frosting the cookies I used the rest of the frosting to try out some of the different decorating tips. Unfortunately by the time I got this far my frosting was of a thinner consistency than would have been ideal, probably because I’d been handling it and it had warmed up. But I practiced my writing with these cool practice sheets they give you. It was fun but I will need a lot more practice I’m sure!


I have a full week of treats to make this week. Thanks for stopping by... Happy Monday!