Wednesday, June 29, 2011

Wilton Flowers & Cake Design - Week 4 prep


I left you with this teaser photo earlier this week. These are the flowers I made as preparation for my final cake in the Wilton Flowers and Cake Design course. I just finished filling and frosting my final cake and I thought I'd share some more photos of my decorations before putting it all together tonight.

I started out making some red roses.


Then I decided to make blue apple blossoms. I don't think blue apple blossoms really exist in real life, but they look cute and went with my theme...

Out of all the flowers we learned, I picked this one because of the contrast in size.

Finally, I made some lilies. This time I finished them following the instructions in the course book since we didn't get to that in class. 

I'm still not exactly sure how I'll put these all together on my cake, but I think it's a good contrast of sizes and textures.

Time to get ready for class!

Monday, June 27, 2011

Wilton Flowers & Cake Design - Weeks 2 & 3


I've procrastinated when it comes to writing about weeks two and three of Flowers & Cake Design (FCD). We haven't followed the course book so it's a little difficult to write about.

My instructor decided to have us learn the majority of the flowers for the whole course during week two using buttercream rather than royal icing which the book instructs. I actually didn't take any photos because, since it was buttercream, we just wiped them back into the tub of icing we brought.

We also learned the basket weave during the second week - I believe it's normally taught during week four.

During week three we learned the Wilton rose and the lily.


The instructor didn't have us add the flower center and the stamens, though I have practiced them at home since for my final cake.

I really love the roses...

They are so much easier than the ribbon rose we learned in Decorating Basics. I've been practicing these since last week's class as well for the final cake.

I actually like working with the royal icing better than buttercream. My instructor said that buttercream was easier since it doesn't dry out as quickly so it would be easier to work with. However, I find that royal icing makes smoother lines and prettier decorations.

This Wednesday will be the final class for FCD. The last class will essentially just be used for assembling our final cake. Royal icing decorations have to be made in advance of placing on the cake - they harden almost as hard as a sugar cube.

Yesterday I went ahead and made all of the flowers for my final cake. I decided to do a 4th of July theme. I'll just leave this photo as a teaser. I'm looking forward to putting everything together on Wednesday!

Saturday, June 25, 2011

My Favorite Frosting


Sorry I haven’t posted in over a week, I’ve been super busy and have been baking but not finding the time to blog. One of the reasons I was busy was because it was my birthday! It was on Wednesday, the 15th but I got to celebrate it (cake and all) as a joint celebration with my dad for Father’s Day.

I was thinking of trying out my new cake decorating skills on a super fancy combo birthday-Father’s day cake, but I decided that I wanted my tried and true, favorite cake for my birthday. Devil’s food cake with cooked vanilla frosting.
  

I’m not sure where the recipe originated but it is the one my mom has been making all my life. I love it because it isn’t too sweet – it’s creamy and amazingly delicious. You can’t decorate a cake with it because it is too soft, butI started using as a filling for my decorated cakes to reduce the overall sweetness from the decorating buttercream.

I know the directions sound a little weird but I promise it is ridiculous delicious. Try this frosting. Seriously. Just do it, you won’t be sorry.

Cooked Vanilla Frosting
Ingredients
3 Tbls flour
¾ cups milk

6 Tbls shortening
6 Tbls butter
¾ cups granulated sugar
1.5 tsp vanilla

Directions
1. Combine flour and milk over medium heat, stirring constantly with a whisk, until thickened. It should be about the same time the mixture starts bubbling.
2. Pour mixture into a bowl, cover with plastic wrap touching surface of mixture, and place in the fridge.
3. In the meantime, cream together shortening and butter for several minutes.
4. Add sugar and beat for several minutes until fluffy.
5. When flour mixture has cooled to room temperature, add to butter mixture and beat for another several minutes until frosting is very fluffy.
6. Add vanilla and beat until combined.
7. Enjoy the most delicious frosting you’ve ever have!

* For this four tier cake, I tripled the recipe


Wednesday, June 15, 2011

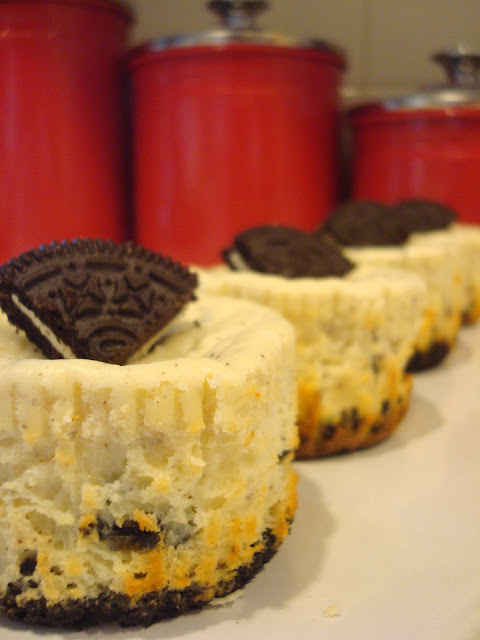
Mini Oreo Cheesecakes


Cheesecake. Probably my favorite dessert. A couple years ago, I was introduced to this place in St. Paul called Cafe Latte. It is sort of an upscale cafeteria-style place and I was told that desserts were their specialty so definitely leave room. That day I got my first taste of Oreo Cheesecake. It was sooooo good! I've since gone back once or twice but haven't been lucky enough to run into Oreo Cheesecake again.

Solution: make my own! So here's my version, mini-sized.


Mini Oreo Cheesecakes
Ingredients
Crust:
18 Oreo cookies
3 Tbls butter

Cheesecake:
3 8oz packages of cream cheese, room temp
1 15oz can sweetened condensed milk
3 eggs
2 Tbls vanilla
12 Oreos, roughly chopped
Oreos for topping

Directions
Prep: Heat oven to 350 degrees
1. Line 24 muffin cups with liners

2. Add 18 Oreos to a food processor

3. Pulse until crumbs form

4. Melt butter in a small bowl. Add Oreos and combine until evenly coated.
5. Add a rounded tablespoon of the Oreo mixture to each liner

6. Use a shot glass to press crumbs into the bottom of the liner. I find it works best to press and twist as you lift up to prevent sticking

7. In a large bowl, beat softened cream cheese until fluffy

8. Beat in sweetened condensed milk
9. Add eggs one at a time, beating after each one
9. Add vanilla and combine
10. Add chopped Oreos to the batter

11. Stir until just combined

12. Spoon batter into muffin liners

They will be pretty full when you are done, that's okay

13. Bake for approximately 15 minutes, rotating pans halfway through
14. Let cool in pan for 5 minutes then remove to cooling rack or directly to refrigerator
15. Top with quartered Oreos if desired

Last but not least, ENJOY!

Saturday, June 11, 2011

Wilton Flowers & Cake Design - Week 1


This past week I started the Wilton Flowers and Cake Design course. I’m taking this class at the Apple Valley (Minnesota) Michael’s. I took Decorating Basics at JoAnn Fabrics but I decided to switch to Michael’s for this class for several reasons, mainly because the location is a little more convenient for me. I know each location is different, but one nice thing about taking the class at this particular Michael’s is that they supply the class book for free. It’s only $5, but a nice bonus none the less.

For the first class we were instructed to bring some neon ready-made fondant and some ready-made gum paste. We learned a little about the different materials. We learned that gum paste dries harder than fondant so it’s better for flowers or objects that need more structure. Fondant won’t try completely solid as it is meant to be able to cut through. I'd never worked with, or tasted, fondant before so it was all useful info to me.

The instructor also went into methods for choosing colors for cakes. Using a color wheel, he talked about at least four different ways to select color combinations from the wheel that will/can work for cakes. 

After that we got to try making two different kinds of flowers. First was the button flower which was made using a mold. The flower comes out in three parts.

These were a complete pain in the butt to get out of the mold. They look pretty cute when they are done... if you don't completely maim them while trying to remove from the mold.

Once they are dry, you stack them together.

Next we tried violets. 

These were fun but a little challenging. The hardest part is ruffling the edges of the flower petals. Takes just the right touch and I think I'll need a little practice on these in order to not tear or stretch out the petals too much.

That's pretty much all we got to on week 1. Next week we'll be learning some buttercream, and possibly royal icing, techniques and flowers.


Tuesday, June 7, 2011

Beach Cookies

You know that saying, "Be careful what you ask for"? A few weeks ago, I was so anxious for spring to arrive when it was snowing in late April that I wrote a blog post about it. Well, today it was over 100 degrees here in Minnesota. 100+ degree days are very rare here and practically unheard of in early June!

I've learned my lesson, so no letter to Mother Nature this time. Instead, I'll share some beach themed cookies with you! If you can't beat 'em - join 'em!

I think these flip flop cookies are probably my favorite cookies that I've done yet. To make them, I started out with a foot cookie cutter.

Then I trimmed the cookie to the shape of a flip flop.

After that, I used the flip flop cookie as a stencil for the remaining foot cookies. It helps to have firmer, chilled dough at this point so put them in the freezer or fridge if they are getting too soft.
To decorate them, I first outlined and flooded the flip flops. Then I added a design right into the wet cookie. Finally, after waiting 30 or more minutes, I added the straps to the flip flops.

I also made beach balls.

Some flowers.

And, of course, suns! These suns were made from a sunflower cookie cutter. I first added a circle of yellow icing to the center of the cookie. Then I added the sun rays in three steps, waiting about 30 minutes between each step in order to give some depth and texture to the cookie.

I have to say, summer isn't my favorite season and this heat is miserable, but these cookies definitely help!

Stay cool!

Sunday, June 5, 2011

Scrabble Wedding Cookies

This weekend I had the privilege of attending the wedding of my childhood neighbor, David, to his beautiful bride, Erin. His family moved in next door to mine when he was three and I was five. Poor David had to put up with so much growing up - he had one sister and lived next door to two girls. We played with Barbies, collected beads, and made up roller-dances in the driveway. Hopefully he wasn't too scarred from all that! I don't think so. He's going to be a brilliant chemist and is now married to a great girl!

I saw these adorable Scrabble cookies on Bridget's (from Bake@350) at few months ago and have been wanting to try making them since then! I thought this was the perfect occasion for them.

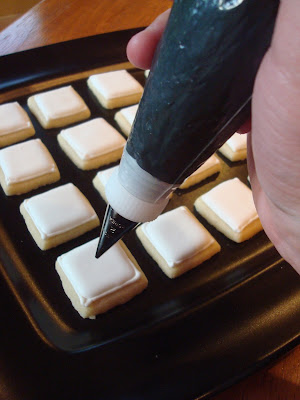
I don't have a square cookie cutter so I had to get creative. I used a ruler to mark off 1.5 inch sections and then used a pizza cutter to cut along the length of the ruler.

Once the cookies were cooked, I outlined and flooded them and added the letters.


Here's the final product:

I decided to put them in a jar.


I made this little tag for the jar because I realized it probably would be hard to tell what this random set of letters was supposed to be.

I attached it to the jar with red ribbon.


Congrats again David and Erin! I'm so happy for you two and wish you the very best!