
On Monday I went to the final class of the Decorating Basics course. This week was light on learning and heavy on decorating which was fun. The supply list for this week included a cake, frosted and ready to decorate as well as icing dyed to whatever colors we wanted for both practicing and decorating our final cakes.
First, we learned about writing on cake and got a chance to practice our technique on our practice sheets. Well, tracing some cursive is no big deal, but having to do it freehand on a cake? Yeah, I was terrified! I am horrible at using cursive in everyday life, probably because I never use it. And I never use it because it looks horrible. Catch 22. I digress... More on cake writing later.
So after practicing our writing, we learned the ribbon rose. Now, I sort of cheated and practiced over the weekend. Several people in class were surprised thinking I’d just gotten it on the first try. Of course I told them I practiced and that it only took 87 sad looking roses, plopped back into the icing bowl immediately upon completion, to get a few good ones. Yeah, that was frustrating.

Finally, the instructor just talked for a couple minutes about the “order of operations” for decorating a cake.
1) Message - so you make sure to have enough room
2) Flowers
3) Leaves
4) Border
And that was it. We now know all the basics to cake decorating. So then it was time to decorate. I was totally lazy and didn’t design an original cake. I just did one from our class book.
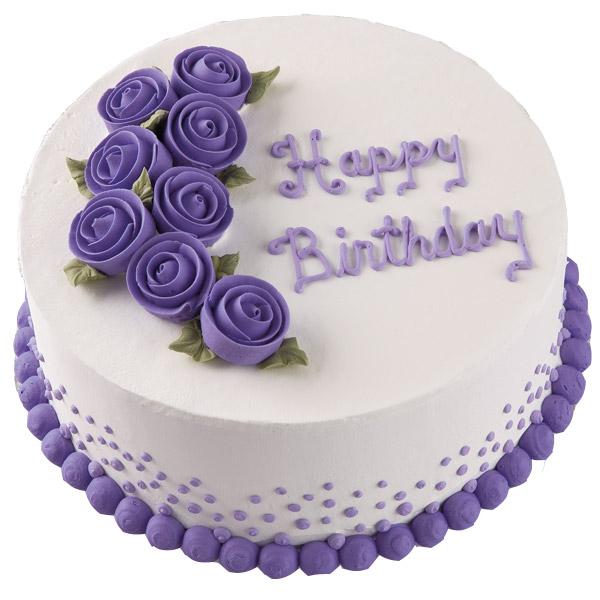 |
| Photo credit: Wilton |
I was making this cake for a coworker’s birthday so the first thing I had to do was writing the birthday message on the cake. I was terrified! Here was this perfectly white, smooth cake and I had a piping bag full of purple icing. Maybe I’m crazy but talking myself up to make the first mark on the cake was like... the feeling you get before jumping off a cliff. Okay, that’s dramatic. More like ripping off a band-aid. It was scary! One wrong move and I’d have to start thinking of creative ways of covering up the scribbles on the cake.

But I was very surprised – writing cursive on a cake is actually much easier than with a pen and paper! Who would have thought? It’s probably because you’re going pretty slow. The real difficulty is not smudging the message while decorating the rest of the cake.... no one warned me to look out for that one...

The rest of the cake was pretty smooth sailing. I piped a mound of white icing where I wanted to roses so they would rest on that and not all flat on the cake. Then I placed my roses, piped some leaves here and there, and did the bottom border and sides of the cake.

This class was a lot of fun. Signing up for this class, and having to get all the supplies, is what led me into the world of decorating and sugar art and to start this blog. I'm having tons of fun with it!

Oh my goodness!!! Now I am even more excited to take the basics class!! Your cake is so AWESOME!!!!
ReplyDeleteThanks Angela! The class was a lot of fun - are you taking it soon?
ReplyDelete