Sunday, March 25, 2012

Owl Birthday Cake


This weekend I had the chance to make another birthday cake for one of the little girls from the Fairy Birthday I got to do a couple months ago. This time for the belated celebration with her family. 

This was a really fun project. It all started with a little inspiration provided by the birthday girl's mom (which was seriously awesome - I don't think I could make that in Paint!):

It was super helpful to have an illustration to go by. She also mentioned that she preferred more realistic owls than some of the popular cakes that are floating around Pinterest that are just simple oval shapes that look like owls.

I took the .jpg she provided and blew it up as big as I thought would fit on the cake while leaving room for the inscription. Then I printed it and used a gel transfer to outline the shape of the owl. After that it was a matter of coloring in the lines.


I got my inspiration for the body portion of the owl from this cake by iambaker. For the owl I used Wilton #10 tip.

I wanted the head and face of the owl to have some texture and look fairly realistic but still cute. I used a Wilton #5 tip to pipe little spikes.

The inspiration and the final product:

I think this may be my favorite cake I've made yet. I'm just in love with this little owl!

Sunday, January 22, 2012

Fairy Birthday

Two weekends ago was all about Butterfly Birthday cakes. The following week I got to work with my friend/coworker, Amanda, on Fairy Birthday cakes for one of our coworker's daughters. It was actually a double birthday party for two little girls from the same playgroup - both turning 2. The order included 36 cupcakes and two 6-inch birthday girl cakes - and of course I had to throw in some sugar cookies as a little surprise!

My coworker's wife, Laura, had a bunch of ideas pinned on Pinterest which provided a lot of inspiration for the cakes. The theme was Fairies and the main colors were pink, purple, and green. We decided on three cupcake designs.

1) The purple sparkly cupcakes
This photo doesn't do the sparkles justice. I used a product called Disco Dust on them and they were very sparkly. It was the first time I used it and I *love* it!!

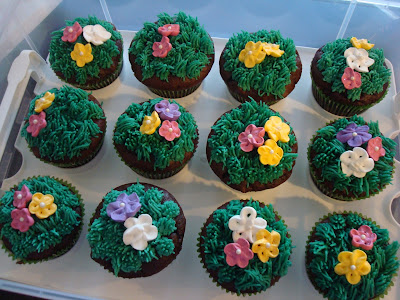
2) The grassy flower cupcakes
I made some pink and yellow flowers and I had some white and purple flowers left from the butterfly birthday cupcakes.

Amanda piped on the grass which turned out so adorable!


3) Butterfly cupcakes
I made chocolate butterflies in yellow and pink, the same process as I did the week before for the Butterfly Birthday party.

Finally it was time to decorate the cakes. I didn't quite have a plan when I started.

I knew I wanted some leaves and flowers on the base so I started with that.

Then Amanda and I looked at them for a bit and decided to place the names in the cake to make sure they were front and center. I made sparkly royal icing transfers for the names - my new favorite method!

Then we piped some grass for the birthday candles and the fairies that we'd been given.


And that was it! Except for one final element that I couldn't add until we set up for the party. Stars for the cakes!
I made these over two days. The first day I piped on royal icing stars onto pre-formed cake wires I got at Michael's. Of course, I sprinkled some sparkles on the wet icing. The next day I flipped them over and piped stars onto the reverse side along with more disco dust.

That was it for the cakes. But I thought the little fairies at the party needed some magic wands. Enter cookie pop magic wands! The birthday girls got monogram ones with matching ribbon and the rest of the kids got polka dot ones.

And, so the parents wouldn't feel left out, I made some extras for them too.


Finally it was time to set it all up and reveal all of our sweets to the parents of the birthday girls.


This project was too fun. I'm so happy we could bring joy to the families and help them celebrate this very special occasion! Happy Birthday, Kylie and Liliana!

Sunday, January 8, 2012

Butterfly Birthday


I've been friends with this girl since the 1st grade. This is my friend, Krystle, and me at her bachelorette party over 5 years ago. Now she has two adorable daughters - I can hardly believe it (we can't possibly be old enough for that...)! We've known each other most of our lives and it was really fun to get to make cakes for her younger daughter's first birthday party last weekend.


When Krystle asked me to make the cakes she gave me two words: "purple" and "butterflies." I spent the next couple weeks "researching" (Googling) ideas for the cakes. On Pinterest I found these adorable chocolate butterfly cupcake toppers and knew instantly that I had to use them. There is a great full tutorial on that site but here are a few photos I took.


I decided not to do butterflies on all of the cupcakes to have a little variety. For the other ones, I pulled out some tricks I learned in my Wilton Flowers & Cake Design class. I made a bunch of these little flowers in purple and white.

Don't they look {super} cute on the cupcakes? I love them.

So after I finished all the cupcakes I frosted the 6-inch topper cake in purple frosting. After I got it frosted I was stumped. I stared at the cake for over an hour holding up flowers here and there... some butterflies... the '1' candle... Finally I came up with this.

Then I added the borders on the top and bottom of the cake and added some more flowers.

Then I realized the birthday girl's name should be on her cake! Duh! I remembered these adorable cupcakes by Sweetopia and made these letters for the cake with some left over royal icing and sanding sugar.

I let them sit overnight (as well as a second, identical set in case of breakage) and placed them on the cake in the morning.

Here's the topper cake all put together:

And the cupcakes:


I also used the die cut machines at Archiver's to make this matching banner. It's hard to tell with the sunlight behind, but the letters are all in different purple, pattered paper:


I also made some butterfly cookies:


The birthday girl loved the those little butterflies - just her size. I think I found my new cookie model:

Finally it was time for Happy Birthday...
The birthday girl and her adoring family
And then CAKE! I was waiting for her to totally destroy my cake... I wanted to see it demolished.

At first she was just curious but then she got some help from mom...

Not too sure about this weird feeling stuff on her hands (can you see the tear?)...

About 15 seconds after that she was over it. No more cake. Here was the aftermath, not bad for her first cake.

What a fun project for a sweet, adorable little girl. Happy birthday, Nora!