Showing posts with label classes. Show all posts

Saturday, July 2, 2011

Wilton Flowers & Cake Design - Week 4


For the final Wilton Flowers & Cake Design class we basically just spent the time assembling our final cakes. I prepped all of my flowers in advance so it only took about 20 minutes to put it all together.


I wasn't exactly sure what to do with everything but here's what I came up with.

Wilton Flowers & Cake Design: 4th of July Style...

The next, and last, course would be Gum Paste & Fondant but I think I'll be waiting at least a month before taking that.

Wednesday, June 29, 2011

Wilton Flowers & Cake Design - Week 4 prep


I left you with this teaser photo earlier this week. These are the flowers I made as preparation for my final cake in the Wilton Flowers and Cake Design course. I just finished filling and frosting my final cake and I thought I'd share some more photos of my decorations before putting it all together tonight.

I started out making some red roses.


Then I decided to make blue apple blossoms. I don't think blue apple blossoms really exist in real life, but they look cute and went with my theme...

Out of all the flowers we learned, I picked this one because of the contrast in size.

Finally, I made some lilies. This time I finished them following the instructions in the course book since we didn't get to that in class. 

I'm still not exactly sure how I'll put these all together on my cake, but I think it's a good contrast of sizes and textures.

Time to get ready for class!

Monday, June 27, 2011

Wilton Flowers & Cake Design - Weeks 2 & 3


I've procrastinated when it comes to writing about weeks two and three of Flowers & Cake Design (FCD). We haven't followed the course book so it's a little difficult to write about.

My instructor decided to have us learn the majority of the flowers for the whole course during week two using buttercream rather than royal icing which the book instructs. I actually didn't take any photos because, since it was buttercream, we just wiped them back into the tub of icing we brought.

We also learned the basket weave during the second week - I believe it's normally taught during week four.

During week three we learned the Wilton rose and the lily.


The instructor didn't have us add the flower center and the stamens, though I have practiced them at home since for my final cake.

I really love the roses...

They are so much easier than the ribbon rose we learned in Decorating Basics. I've been practicing these since last week's class as well for the final cake.

I actually like working with the royal icing better than buttercream. My instructor said that buttercream was easier since it doesn't dry out as quickly so it would be easier to work with. However, I find that royal icing makes smoother lines and prettier decorations.

This Wednesday will be the final class for FCD. The last class will essentially just be used for assembling our final cake. Royal icing decorations have to be made in advance of placing on the cake - they harden almost as hard as a sugar cube.

Yesterday I went ahead and made all of the flowers for my final cake. I decided to do a 4th of July theme. I'll just leave this photo as a teaser. I'm looking forward to putting everything together on Wednesday!

Saturday, June 11, 2011

Wilton Flowers & Cake Design - Week 1


This past week I started the Wilton Flowers and Cake Design course. I’m taking this class at the Apple Valley (Minnesota) Michael’s. I took Decorating Basics at JoAnn Fabrics but I decided to switch to Michael’s for this class for several reasons, mainly because the location is a little more convenient for me. I know each location is different, but one nice thing about taking the class at this particular Michael’s is that they supply the class book for free. It’s only $5, but a nice bonus none the less.

For the first class we were instructed to bring some neon ready-made fondant and some ready-made gum paste. We learned a little about the different materials. We learned that gum paste dries harder than fondant so it’s better for flowers or objects that need more structure. Fondant won’t try completely solid as it is meant to be able to cut through. I'd never worked with, or tasted, fondant before so it was all useful info to me.

The instructor also went into methods for choosing colors for cakes. Using a color wheel, he talked about at least four different ways to select color combinations from the wheel that will/can work for cakes. 

After that we got to try making two different kinds of flowers. First was the button flower which was made using a mold. The flower comes out in three parts.

These were a complete pain in the butt to get out of the mold. They look pretty cute when they are done... if you don't completely maim them while trying to remove from the mold.

Once they are dry, you stack them together.

Next we tried violets. 

These were fun but a little challenging. The hardest part is ruffling the edges of the flower petals. Takes just the right touch and I think I'll need a little practice on these in order to not tear or stretch out the petals too much.

That's pretty much all we got to on week 1. Next week we'll be learning some buttercream, and possibly royal icing, techniques and flowers.


Wednesday, May 25, 2011

Wilton Decorating Basics - Week 4

On Monday I went to the final class of the Decorating Basics course.  This week was light on learning and heavy on decorating which was fun. The supply list for this week included a cake, frosted and ready to decorate as well as icing dyed to whatever colors we wanted for both practicing and decorating our final cakes.

 First, we learned about writing on cake and got a chance to practice our technique on our practice sheets. Well, tracing some cursive is no big deal, but having to do it freehand on a cake? Yeah, I was terrified! I am horrible at using cursive in everyday life, probably because I never use it. And I never use it because it looks horrible. Catch 22. I digress...  More on cake writing later.

So after practicing our writing, we learned the ribbon rose. Now, I sort of cheated and practiced over the weekend. Several people in class were surprised thinking I’d just gotten it on the first try. Of course I told them I practiced and that it only took 87 sad looking roses, plopped back into the icing bowl immediately upon completion, to get a few good ones. Yeah, that was frustrating.

Finally, the instructor just talked for a couple minutes about the “order of operations” for decorating a cake.
1) Message - so you make sure to have enough room
2) Flowers 
3) Leaves
4) Border

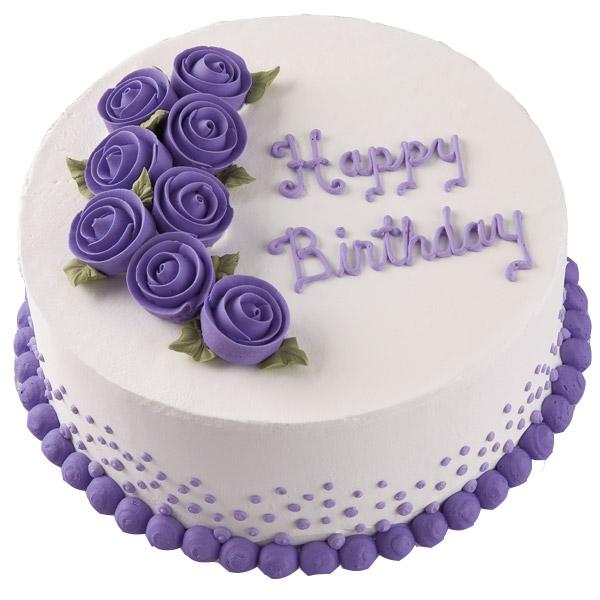
And that was it. We now know all the basics to cake decorating. So then it was time to decorate. I was totally lazy and didn’t design an original cake. I just did one from our class book.
Photo credit: Wilton
I was making this cake for a coworker’s birthday so the first thing I had to do was writing the birthday message on the cake. I was terrified! Here was this perfectly white, smooth cake and I had a piping bag full of purple icing. Maybe I’m crazy but talking myself up to make the first mark on the cake was like... the feeling you get before jumping off a cliff. Okay, that’s dramatic. More like ripping off a band-aid. It was scary! One wrong move and I’d have to start thinking of creative ways of covering up the scribbles on the cake.

But I was very surprised – writing cursive on a cake is actually much easier than with a pen and paper! Who would have thought? It’s probably because you’re going pretty slow. The real difficulty is not smudging the message while decorating the rest of the cake.... no one warned me to look out for that one...

The rest of the cake was pretty smooth sailing. I piped a mound of white icing where I wanted to roses so they would rest on that and not all flat on the cake.  Then I placed my roses, piped some leaves here and there, and did the bottom border and sides of the cake.

This class was a lot of fun. Signing up for this class, and having to get all the supplies, is what led me into the world of decorating and sugar art and to start this blog. I'm having tons of fun with it!

Tuesday, May 10, 2011

Wilton Decorating Basics - Week 2


Last night was the second week of my cake decorating class. We got to actually decorate our first cake! It was fun but definitely not as easy as I thought it would be.

For this class we had to bring an unfrosted cake, two batches of icing (using the Wilton class recipe) - one medium consistency and one thin consistency, and filling for the cake. And, of course, all of our decorating tools.

First we torted and filled our cakes. I used leftover cake layers and filling from my Mother's Day cake. After that we frosted the cake with the thin icing.
We didn't do a crumb coat first and you can can definitely see a lot of crumbs in my frosting. I think if I'm at home, I'll definitely do a crumb coat from now on.

Then we let our cakes sit for a bit while we practiced using some different tips.

After our cake crusted over, we smoothed out the icing with parchment paper and then did a gel transfer. It's hard to see in this photo, but there's clear piping gel in the shape of a cupcake. You can basically "color in the lines" with your icing after that. Here is the cupcake liner.

Then I added the cupcake frosting

Finally, the cherry on top. And I decided to use some of the extra icing to pipe a dot border around the bottom of the cake.

When I got home, I added sprinkles to the cupcake frosting.

I brought the cake to work today and my coworkers liked it! I was a little worried about it because the frosting by itself doesn't taste too great. I'd read this before from people talking about the class - that it just tastes like pure Crisco, but on a cake, it's actually okay! Good to know. :-)

Next week we learn how to do some flowers on cupcakes - looking forward to it!

Tuesday, May 3, 2011

Wilton Decorating Basics - Week 1


I have been anxiously awaiting my cake decorating course for over a month. My friend, A, and I signed up for the class together at a local JoAnn Fabrics store. We wanted to take the April course but it was full. So... it was a long wait, but last night we had our first class.

Most of the class was lecture. Our instructor demonstrated how to make Wilton buttercream (we will have to make a lot of this throughout the course of the class), how to level a cake, how to torte a cake, and the proper way to frost a cake. She also showed us how to do a gel transfer, which we will be doing next week, as well as several other things.

During the last 20 minutes we were able to practice fitting a bag with a coupler and tip, filling a bag with frosting, and piping stars. We were instructed to bring a pre-made can of Wilton icing as well as our own cookies to practice on.

While piping stars isn't that exciting, it was fun to try to pipe icing that is cake-consistency rather than the cookie consistency that I'm used to.

We didn't use all of our icing jar in class so when I got home from work today I decided to try out some different things. The pre-made icing comes as "stiff" consistency but in class we added water to make it "medium." My experiments really should have been done with stiff icing in order to hold their shape better, but it was still fun.
Don't k now if this is right, made it up as I went along...
Just imagine a cake covered in this... so pretty!

I think I'm going to like cake decorating...

Next week we will decorate our first cake - can't wait!